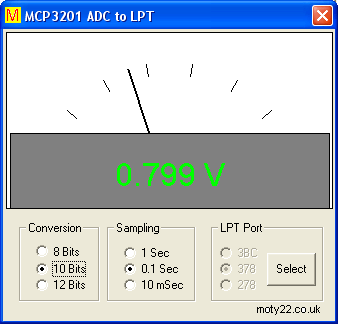
SELF POWERED ADC INTERFACE TO PARALLEL PORT see also this
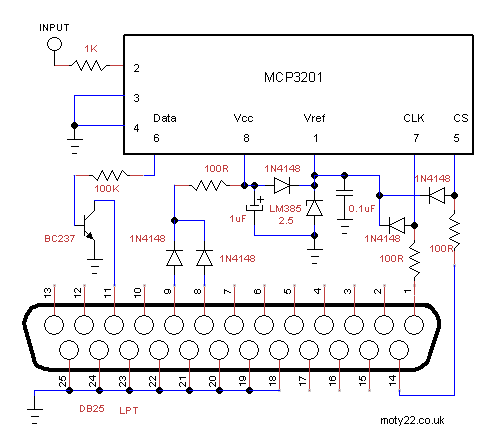
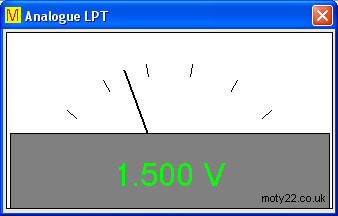
Project for connecting analogue signal to LPT printer port. Included Visual Basic 6 software and a circuit diagram. The MCP3201 is a micro-power 12 bit analogue to digital converter. The conversion selector selects the MSB when it sets to 8 Bit or 10 Bit and ignores the rest of the bits. With less resolution the reading is more stable. The supply to the circuit is via the 5V at pins that are switched to logic high by the software.
The VB6 software includes a freeware DLL from http://www.highrez.co.uk/downloads/inpout32/ ,keep the .dll file and the .exe file in the same folder.
Datasheet for the MCP3201 can be downloaded from http://ww1.microchip.com/downloads/en/DeviceDoc/21290D.pdf. LTC1285, ADS7822 are direct replacement to MCP3201.
VB6 code (30KB).
Input at pin 2 of the ADC is 0 to 2.5 volts full range positive voltage only. The chip over voltage protection is 5V max.
Pin 8 is the supply to the IC and it is about 3.2 V.
Pin 1 is reference voltage for the ADC and cannot be changed because it regulates the supply to the IC.
Pin 6 is the serial data out of the ADC, BC237 is a TTL level drive.
Pin 7 is the clock for reading the data, 100pF is for filtering crosstalk from the cable.
Pin 5 is the Chip Select.
100R resistors and diodes on these lines are for clipping the voltage to the Vcc of the IC.
LPT plug
Pins 23,34,25 are earth. Pins 1,11,14 are inputs and outputs used for reading the ADC data. Pins 8,9 are switched to 5 V ,
output high, by the software and are used for powering the circuit.
LCD DISPLAY
INTERFACE TO PARALLEL PORT see also usb_lcd.php
A project of connecting
LCD display module to LPT printer port with multi lines and adjustable characters number. Included a VB6 software, Visual Studio 2005 VB and
a circuit diagram. There are several makes of this module that are interchangeable, the one I used is UC-16207. The LCD module has a 14 way connector, 8 pins are used for data, 2 for supply, register select(RS), read/write, enable (E) and contrast adj. The R/W input must be connected to earth to make sure that data lines are in input mode. The VB application has only basic functions, it can be changed to interface the display for a variety of inputs.
The LCD module requires a delay of 2 ms or longer for some of the commands and clock (Enable) of 10 us or longer. By loop counting during Timer1 of 100 ms interval the speed of the cpu can be assessed and used to set micro-second time base.
The io.dll file has to be in the same folder as the exe file.
You can read more about LPT interface in http://www.beyondlogic.org/spp/parallel.htm
The download includes a freeware DLL (io.dll) which can be updated from http://www.geekhideout.com/iodll.shtml
Keep the .exe file and .dll in the same folder.
5 volt supply can be an external
power supply, using the hosting computer 5V is much preferred because
variation between the computer 5V and the external 5V can lead to
undesirable currents through the data lines. 5 volt supply is available
at a USB port or the 4 way peripherals connector from the internal
power supply unit.
Module can work with voltage range of 3.3 to 5 volts. Below 5 V the module doesn't initiate on power up so the VB extra instructions have to be enabled.
20K trimmer is needed to adjust the contrast voltage which vary with different batches of LCD.
Pins 7 to 14 of the LCD are data inputs. Pin 6 is clock input, enables LCD module to read the data.
Pin 4 is Register Select input, it is used for 16 bits instruction.
ANALOGUE
INTERFACE TO PARALLEL PORT
A project of connecting
analogue signal to LPT printer port. Included a VB6 software and
a circuit diagram. The ADC0804 is an 8 bit analogue to digital converter.
74HC4052 multiplexes the 8 bits output of the ADC into 2 data lines,
it is needed because most LPT's have only 5 input lines. 74HC4052 can be replaced by 4052B CMOS.
You can read more about LPT interface in http://www.beyondlogic.org/spp/parallel.htm
The VB6 software includes a freeware DLL (inpout32.dll) from
http://www.highrez.co.uk/downloads/inpout32/
VB6 code (30KB). Keep the .exe file and .dll in the same folder. You are free to use the circuit diagram and the VB software with no
limitations.
5 volt supply can be an external
power supply, using the hosting computer 5V is much preferred because
variation between the computer 5V and the external 5V can lead to
undesirable currents through the data lines. 5 volt supply is available
at a USB port or the 4 way peripherals connector from the internal
power supply unit.
10k resistor and 470pF are for setting the internal clock of the
ADC.
Input at pin 6 of the ADC is 0 to 5 volts full range positive voltage
only. The chip over voltage protection is 30V max.
Pins 2 and 3 of LPT select the 2 out of 8 bits to be read. Pins
15 and 13 read the selected 2 bits. Pin 1 initiates the ADC.
74HC4052 can be replaced by 4052B CMOS 4000 series.
01.03.2020 - 17:01
Name: Moty
Comment: Hi Leslie,
I don't have projects for Commodore, I've seen some on google. There are many projects for Commodore and Arduino:
https://www.google.com/search?client=firefox-b-d&q=+arduino+projects+for+commodor+
01.03.2020 - 07:22
Name: Leslie
Comment: do you have any projects for Commodore (Vic20, C64, C128) computers?
08.02.2020 - 23:59
Name: Moty
Comment: Hi Leslie,
BASIC of Commodore is different to windows BASIC. It also differ from one Commodore to another. Unfortunately I forgot that language. Also the printer connectors are different so my code has to be rewritten. I don't know what your project is and I can only suggest to use a newish microcontroller because you can find more example code on the net.
08.02.2020 - 08:17
Name: Leslie Giannini
Comment: would it be possible for you to write the software for this project
using BASIC so i can learn better ? i plan on making a stand-alone pcb board
using 6502 & 6522/6526 which would be based on Commodore pc's. i would really
appreciate it if you could do this for me. Thank you, Leslie.
09.10.2016 - 21:47
Name: Moty
Comment: Hi Jim, check that your BIOS are set to ports 378h-37fh and LPT is enabled, see the link above for more information. Turn the 20K pot until you get light grey rectangles.
09.10.2016 - 03:54
Name: jim
Comment: i got questions, it doesnt work on my unit, windows xp, vb6 is installed, the .exe program is opening but it doesn't show what i type at the program, please send me some help
18.04.2016 - 01:05
Name: elvis
Comment: project OK
07.07.2015 - 17:52
Name: Moty
Comment: Hi Alexander. for 20x4 you have to change the VB6 code.
07.07.2015 - 05:02
Name: Alexander
Comment: How if we would like to use 20x4 LCD?
31.05.2015 - 16:02
Name: Hans Andersson
Comment: I have not build it yet. But I will try. I seems to work fine.
17.10.2014 - 23:22
Name: kanishka
Comment: great projet
29.03.2013 - 12:20
Name: steve
Comment: Very Good Project
21.01.2016 - 06:27
Name: Miguel RG
Comment: If you want this to work in windows 7/8/10, you have to update the inpout32.dll to a newer version.
Thank you.
16.02.2013 - 05:29
Name: Moty
Comment: Hi Re,
You can download the VB code from this page.
15.02.2013 - 06:50
Name: re
Comment: plese sent project voltmetr
02.09.2012 - 13:10
Name: comment
Comment:
11.06.2010 - 09:34
Name: Ajit shrivastava
Comment: i love it
24.05.2015 - 15:56
Name: Ram
Comment: very clean, i like this idea, Thank you very much!!!
16.12.2010 - 14:15
Name:
Comment:
Name: Jeff
Comment: I just found your circuit and software really interesting as I'm just learning these types of projects. Would you have the time to document the lines of vb code for me because I really dont understand what the heck is going on "I'm lost".I am trying to construct a 12v car battery voltmeter for home use. Any help would be appreciated more that you know.
Thanks
Jeff
Name: Moty
Comment: Hi Jeff
I've added comments to the VB code, download it again please, hope it helps. I used simple math but it is always a straggle to follow other people's way of thinking.
The project is intended for using your computer to measure voltage. If you wish to measure voltages over 2.5V you need a voltage divider at the analogue input of the ADC. For example a resistor of 10K from input to earth and a second resistor of 100K from input to the measured voltage will give you a measuring range of 27.5V. When you change the value of 2.5 to 27.5 in the VB code the meters will read full scale of 27.5V
Good luck, If you need more help don't hesitate to ask.
Name: Jeff
Comment: Moty,
Thanks for the help you made my day.I ordered the parts to construct the circuit today but there are a few things I still dont understand within the software. The command "If GetPortBit(889, 7) = True" confuses me. As far as I can tell you are reading pins 10,11 and 12 of the status port where 889 is the status port address and 7 in binary is "111" but you are only using pin 11 in the circuit. Could you explain what is really going on? I also understand the next command mathematically "bit = 2 ^ bitcount" , but why do we need it, why do you have to square the bitcount? can you please help? I have another question, but lets save it for later.
Thanks Again,
Jeff
Name: Moty
Comment: You are welcome, Jeff.
Function GetPortBit(889, 7) reads decimal port 889 (status register) 7th bit at pin 11 of the LPT. This pin has the data from the ADC.
bit = 2 ^ bitcount converts binary number into decimal. The LSB (least significant bit) + second bit * 2 + third bit *2 ^ 2 + forth bit * 2 ^ 3, and so on.
Name: Jeff
Comment: Moty, Good Day, and thanks again. I have
some questions about the circuit itself and I was wondering if it would be alright
to e-mail you an Excel file that is marked up with my questions.I think it would
be an easy way to find out what I need and only use a minimal amount of your time.
If this is o.k. then send me an e-mail and I'll reply so you dont have to put
your e-mail out for everybody to see.