|
USB FLASH DRIVE PICTURE FRAME USING CH376
The PIC reads bitmap file on the USB flash drive and displays it on the TFT screen module. CH376S interface is with SPI1 bus, the TFT interface is
SPI2 in PIC16F1827. Each picture is loaded in about 3 seconds and displayed for 3 seconds like a slide show. The PIC opens the image file, reads one byte at a time and load it to the TFT RAM.
CH378 USB host module is from eBay: https://www.ebay.co.uk/sch/i.html? P_S link is set to S (Serial) position. The wiring of the board sets it to SPI mode.
LCD TFT Module uses driver ST7735, 1.8", 128 x 160 pixels.
The TFT and CH376 modules are powered by 5V, the PIC is powered by 3.8V from the 5V minus 2 diodes drop.
The code for the CH376 is derived from several Arduino libraries.
TO SET UP THE SD CARD:
Format the USB flash drive to FAT32.
Resize image file to 128x160 pixels.
Name the files using short names "1.bmp", "2.bmp", etc.
Save the file as 24 bits bmp.
Add the file to the root folder
of the card (don't use a directory).
  
 COLOR OLED PICTURE FRAME PIC16F1827
The PIC reads bitmap file on the SD card and displays it on the color OLED module. The firmware works for SD
and SDHC cards (2-32GB). SD card interface is with SPI1 bus, the OLED interface is
SPI2 in PIC16F1827. Each picture is loaded in about 1 second for 8 seconds like a slide show.
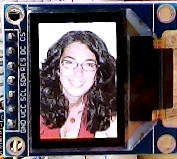
OLED Module uses driver SSD1331, 0.95", 96 x 64 pixels. https://www.ebay.co.uk/
Micro SD card
is connected via micro SD module.
The Micro SD and SSD1331 modules are powered by 5V, the PIC is powered by 3.8V from the 5V minus 2 diodes drop. It is done because the SSD1331 don't tolarate more than 4V at the inputs. Error LED indicates problem with the SD card. I tested this project with 2GB, 8GB and 32GB SD cards.
TO SET UP THE SD CARD:
Format the card with FAT32.
Resize image file.
Name the files using short names "1.bmp", "2.bmp", etc.
Save the file as 24 bits bmp.
Convert bmp files to 16 bits (5:6:5) using https://online-converting.com/image/convert2bmp/
Add the file to the root folder
of the card (don't use a directory).
 
 ARDUINO SD COLOR OLED PICTURE FRAME
The Arduino reads bitmap file on the SD card and displays it on the color OLED module. The firmware works for SD
and SDHC cards (2-32GB). SD card interface is with SPI bus, the OLED interface is
USART as SPI in ATMEGA328.
OLED Module uses driver SSD1331, 0.95", 96 x 64 pixels. https://www.ebay.co.uk/
Micro SD card
is connected via micro SD module.
TO SET UP THE SD CARD:
Format the card with FAT32.
Resize image file.
Name the files "1.bmp", "2.bmp", etc.
Save the file as 24 bits bmp.
Convert bmp files to 16 bits (5:6:5) using https://online-converting.com/image/convert2bmp/
Add the file to the root folder
of the card (don't use a directory).
 
ARDUINO SD TFT PICTURE FRAME
The Arduino reads bitmap file on the SD card and displays it on the TFT module. The firmware works for SD
and SDHC cards (2-32GB). SD card interface is with SPI bus, the TFT interface is
USART as SPI in ATMEGA328.
LCD TFT Module uses driver ST7735, 1.8", 128 x 160 pixels.
SD card
can be connected via 1K resistors or using micro SD module.
TO SET UP THE SD CARD:
Format the card with FAT32.
Create image file using MS Paint or another program, file size is 61KB, image size
160 pixels high by 128 pixels wide.
Name the files "1.bmp", "2.bmp", etc.
Save the file as 24 bits bmp.
Add the file to the root folder
of the card (don't use a directory).
  
SD CARD FAT32 PICTURE FRAME
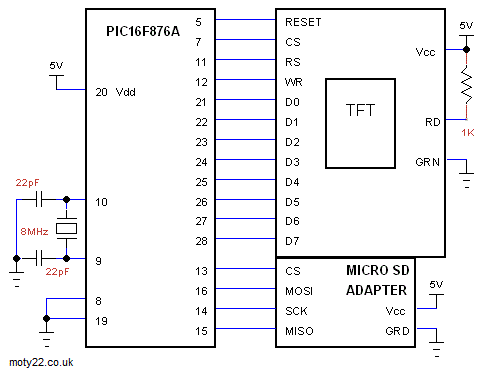
This project uses PIC16F876A and 320x240 TFT with driver ILI9341. The program displays BMP pictures from the SD/SDHC card formatted FAT32. The code has functions that find the root directory, read the files location from the Root Directory and streams the data to the TFT. The code displays the files in rotation. The software can read only FAT32 and only from the root directory. The file name and size isn't read.
To setup the SD/SDHC card: format the card with FAT32, add files to root folder without directories. Each picture file size is 226KB, image size 320 pixels high by 240 pixels wide, saved as 24 bits bitmap. Files names have to be 8.3 type, 8 characters max. File can be created using MS Paint.
After programming the PIC16F876A connect pin 1 (reset) to 5V.
More about FAT32 in this document: https://staff.washington.edu/dittrich/misc/fatgen103.pdf
Good free specifications for SD can be found in SanDisk PDF: http://alumni.cs.ucr.edu/~amitra/sdcard/ProdManualSDCardv1.9.pdf
You are free to use the circuit diagram and software with no
limitations.
 

 SD CARD TFT PICTURE FRAME PIC16F1827
The PIC16F1827 reads bitmap files on the SD card and displays it on the TFT module. The firmware works for SD/SDHC cards (2-32GB). SD card interface the PIC with hardware SPI 1 of the PIC, TFT interfaced with SPI 2.
The software reads the files on the SD card and loads each evry 10 seconds, like a slide show. The SD is read one byte at a time and write it to the TFT until 61,494 bytes are read.
The pic firmware can read only bitmap file of 24 bits bmp type. The file has to be size of 160 pixels width and 128 pixels high. The firmware removes the bitmap header (54 bytes) and then streams the rest of the file to the TFT. Every 3 bytes are the 24 bits color for one pixel.
LCD TFT Module uses driver ST7735, 1.8", 128 x 160 pixels.
TO SET UP THE SD CARD:
Format the card with FAT32.
Create image files using MS Paint or another program, file size is 61KB, image size 128 pixels high by 160 pixels wide.
Name the files 1.bmp, 2.bmp etc.
Save the files as 24 bits bmp.
Add the files to the root directory
of the card (don't use folders).
 
 SD CARD TFT PICTURE FRAME PIC16F690
The PIC16F690 reads bitmap files on the SD card and displays it on the TFT module. The firmware works for SD/SDHC cards (2-32GB). SD card interface the PIC with hardware SPI of the PIC, TFT interfaced with software (bit banging) SPI.
The software reads the files on the SD card and loads each evry 10 seconds, like a slide show. The SD is read one byte at a time and write it to the TFT until 61,494 bytes are read.
The pic firmware can read only bitmap file of 24 bits bmp type. The file has to be size of 160 pixels width and 128 pixels high. The firmware removes the bitmap header (54 bytes) and then streams the rest of the file to the TFT. Every 3 bytes are the 24 bits color for one pixel.
LCD TFT Module uses driver ST7735, 1.8", 128 x 160 pixels.
TO SET UP THE SD CARD:
Format the card with FAT32.
Create image files using MS Paint or another program, file size is 61KB, image size 128 pixels high by 160 pixels wide.
Name the files 1.bmp, 2.bmp etc.
Save the files as 24 bits bmp.
Add the files to the root directory
of the card (don't use folders).
 
Circuit Description
See also Technical Tips
Micro SD Module
http://www.ebay.co.uk/itm/Micro-SD-Card-Reader-SPI-for-Arduino-Raspberry-Pi-UK-Seller-/322502815052?hash=item4b16aa6d4c:g:z9EAAOSwONBZCQQ5
LCD TFT Module uses driver ST7735, 1.8", 128 x 160 pixels.
https://www.ebay.co.uk/itm/141999175585?hash=item210fcf77a1:g:My0AAOSwBLlVZCpN
|
![]()
moty22.co.uk 2008-2025