|
ARDUINO OLED REAL TIME TALKING CLOCK
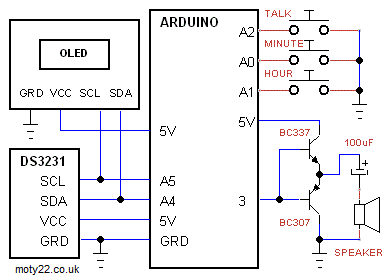
OLED Talking real time clock with Arduino Uno or Nano using RTC DS3231, OLED SSD1306 128x32 0.91". Sound is generated by TTS lib "TALKIE", can be downloaded from github https://github.com/ArminJo/Talkie
Sound available in US English only. Transistors BC337 and BC307 amplify the sound to drive 8 ohm speaker, equivalents transistors can be used. Any other amplifier can be used instead of the transistors. Audio output is at pin 3 .
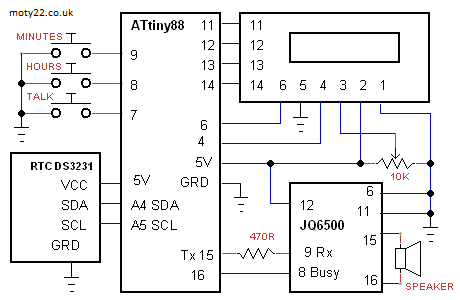
RTC DS3231 LCD TALKING CLOCK ATtiny88
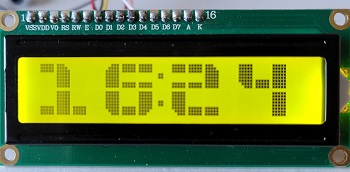
LCD 16x2 Large characters talking real time clock with low cost Nano ATtiny88 using RTC DS3231. Software UART Tx drives the JQ6500 player.
JQ6500 includes memory chip of 2/4 MB and used to store the sound tracks (no need for SD Card). Loading the tracks to the memory is done using an app on the JQ6500 , change the app (MusicDownload.exe file) Compatibility to Windows 7 to get it to work properly. MP3 sound files give better sound. More about JQ6500: https://community.element14.com and https://components101.com
ATttiny can be programmed using Arduino IDE. Use these instructions https://handsontec.com/dataspecs/module/Arduino/Arduino%20Tiny%2088.pdf
RTC DS3231 OLED TALKING CLOCK ATtiny84
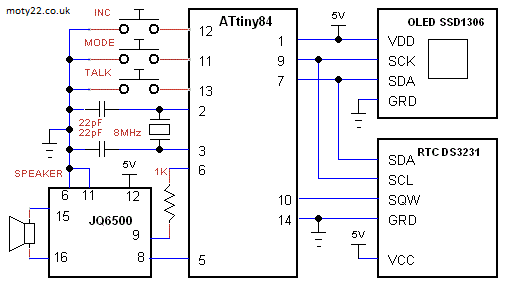
OLED Talking real time clock with ATtiny84 using RTC DS3231, OLED SSD1306 128x64 and JQ6500 Player. The day month and year are displayed. MODE button selects what part off date to set, the part is marked with a line. Button INC changes the value. ATtiny sets SQW to 1Hz it used to trigger time reading.
I2C interface of OLED and RTC use lib "tinyI2C" that can be downloaded from GitHub: https://github.com/technoblogy/tiny-i2c/tree/master
8MHz crystal is needed for the software UART Tx, the internal oscillator isn't stable enough.
JQ6500 includes memory chip of 2/4 MB and used to store the sound tracks (no need for SD Card). Loading the tracks to the memory is done using an app on the JQ6500 , change the app (MusicDownload.exe file) Compatibility to Windows 7 to get it to work properly. MP3 sound files give better sound. More about JQ6500: https://community.element14.com and https://components101.com
ATtiny can be programmed using Arduino IDE and Arduino as ISP, see Technical Tips Burning bootloader with setting "Clock Source 8MHz(external)" and Pin Mapping: "Clockwise".
 LCD TALKING REAL-TIME-CLOCK PIC16F1827
The clock uses DS3231 Real Time Clock module. MODE button is for setting time and date. Hr sets the hour, mi setst minutes, Dy sets days and Yr sets year.
The DF Player plays many
sound formats. The talking clock can be used in other languages. In
languages that numbers are read in different order, like Arabic, section of
the code has to be changed and number of tracks changed too. MP3 files in
English can be downloaded above.
Display is 16x2 LCD, HD44780
compatible.
Format the card with FAT32. No folders or
subfolders.
Copy to the root folder the files, one at a time and in this order; 0 to 19 (20 files),20,30,40,50,"hours","minutes","good day" (or any other message). Totally 27 files. If you make a mistake while copying the files to the
SD it isn't good enough to delete a file, you must start again with
formatting the SD. The reason for loading the files one at a time is
that if you load them together the PC sends them to the card in the
order it finds fit, and when the code plays them it picks up the files
without searching for their name.
 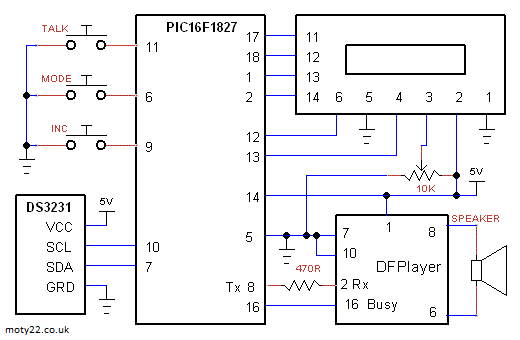  
Circuit Description
See also Technical Tips
DFPlayer mini module is sold as MP3 player. https://www.ebay.co.uk
470R resistor is to reduce the 5V output of the Arduino to 3.3V input of the DFPlayer.
Connecting 10-100
ohm resistor in series to the speaker reduces the current from the 5V
supply.
LCD TALKING REAL-TIME-CLOCK PIC16F876A
The clock uses DS3231 Real Time Clock module. MODE button is for setting time and date. Hr sets the hour, mi setst minutes, Dy sets days and Yr sets year.
The DF Player plays many
sound formats. The talking clock can be used in other languages. In
languages that numbers are read in different order, like Arabic, section of
the code has to be changed and number of tracks changed too. MP3 files in
English can be downloaded above.
Display is 16x2 LCD, HD44780
compatible.
Format the card with FAT32. No folders or
subfolders.
Copy to the root folder the files, one at a time and in this order; 0 to 19 (20 files),20,30,40,50,"hours","minutes","good day" (or any other message). Totally 27 files. If you make a mistake while copying the files to the
SD it isn't good enough to delete a file, you must start again with
formatting the SD. The reason for loading the files one at a time is
that if you load them together the PC sends them to the card in the
order it finds fit, and when the code plays them it picks up the files
without searching for their name.
After programming the PIC16F876A connect pin 1 (reset) to 5V.
 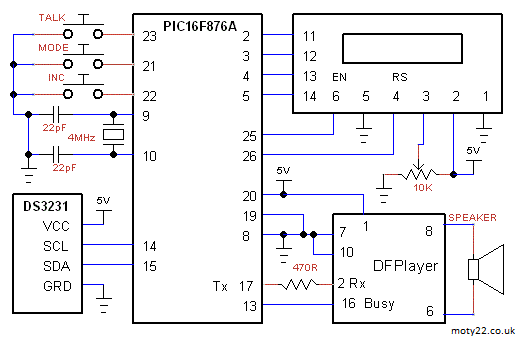  
Circuit Description
See also Technical Tips
DFPlayer mini module is sold as MP3 player. https://www.ebay.co.uk
470R resistor is to reduce the 5V output of the Arduino to 3.3V input of the DFPlayer.
Connecting 10-100
ohm resistor in series to the speaker reduces the current from the 5V
supply.
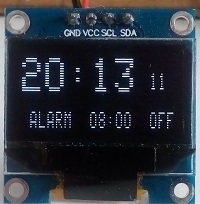
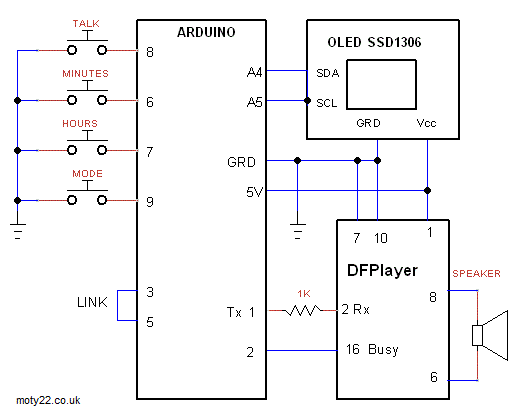
ARDUINO OLED TALKING ALARM-CLOCK DF-Player / JQ6500 Player
The clock uses ATMEGA328 internal timers
to get 1 second time base which is as accurate as the 16MHz crystal. The
code works for Arduino Nano and Uno only.
The Player plays many
sound formats. The talking clock can be used in other languages. In
languages that numbers are read in different order, like Arabic, section of
the code has to be changed and number of tracks changed too. MP3 files in
English can be downloaded above. Track 28 (alarm sound) can be replaced by a song you like.
MODE button is for setting time and volume. M_C sets the clock, M-A setst alarm time, M-O sets alarm ON/OFF and M-V sets volume.
When power comes on after power cut TALK button has to be presset to start the clock.
Display is OLED 0.96", SSD1306, I2C.
JQ6500 includes memory chip of 2/4 MB and used to store the sound tracks (no need for SD Card). Loading the tracks to the memory is done using an app on the JQ6500 , change the app (MusicDownload.exe file) Compatibility to Windows 7 to get it to work properly. More about JQ6500: https://community.element14.com and https://components101.com
For DF Player Format the card with FAT32. No folders or
subfolders.
Copy to the root folder the files, one at a time and in this order; 0 to 19 (20 files),20,30,40,50,"hours","minutes","good day" (or any other message), alarm. Totally 28 files. If you make a mistake while copying the files to the
SD it isn't good enough to delete a file, you must start again with
formatting the SD. The reason for loading the files one at a time is
that if you load them together the PC sends them to the card in the
order it finds fit, and when the code plays them it picks up the files
without searching for their name. The software includes wave files in
English.
DFPlayer and JQ6500 mini modules are sold as MP3 player for Arduino. https://www.ebay.co.uk and https://www.ebay.co.uk
 
 ARDUINO LCD AND SD CARD TALKING CLOCK
The clock tells the time by playing back
tracks from the SD. The SD (2-32GB) is FAT32 formatted. The tracks are wave
(.wav) files of 22.050 KHz, 8 bits, mono. SD card interface is in
SPI mode. The clock has an hourly announcement of time. The optional NIGHT SWITCH when closed disables the
hourly announcement.
The LCD module is 2 lines 16 characters.
The ATMEGA328P generates audio using PWM.
Sound tracks can be any sound. The code doesn't read the file name, it goes to the file number in the list of 27 files. The code plays tracks
in this order: tens of hours, hours, "hours", tens of minutes, minutes,
"minutes" and then a message, for example; "have a nice day".
Good free specifications for SD can be found in SanDisk PDF: http://alumni.cs.ucr.edu/~amitra/sdcard/ProdManualSDCardv1.9.pdf
The SD
card has to be prepared this way:
Files have to be
22.050 KHz, 8 bits, mono. With short names
(max 8 characters).
Format the card with FAT32. No folders or
subfolders.
Copy to the root folder the files, one at a time and in this order; 0 to 19 (20 files),20,30,40,50,"hours","minutes","good day" (or any other message). Totally 27 files. If you make a mistake while copying the files to the
SD it isn't good enough to delete a file, you must start again with
formatting the SD. The reason for loading the files one at a time is
that if you load them together the PC sends them to the card in the
order it finds fit, and when the code plays them it picks up the files
without searching for their name. The software includes wave files in
English.
 
Circuit Description
See also Technical Tips
LCD supply is 5V. The SD Card supply is only 3.3V (3-3.6V) The 3.3V
and 5V are generated on the Arduino board.
The PWM output is boosted by 2 transistors push-pull. The signal to
the speaker is PWM of 62 KHz and the speaker outputs the modulated audio
only. The speaker should be 8 ohms or higher.
Digital outputs from the Arduino to the SD card use 1K and 2K resistors to reduce the 5V signals to 3.3V. SD output at pin 7 is 3.3V but is enough to drive the input.
The pins number are for ordinary SD card, for MicroSD the pins are
different.
Link between Arduino pins 3 and 5 connect 1000 Hz clock
from timer 2 to timer 1, these timers generate 1 minute time base.
LCD display and driver has 14 way connector, 10 connections are used, 4
bits data bus is selected. 10K pot adjusts the contrast. Use 16 x 2 LCD
module. PIC16F628A LED MODULE TM1637 TALKING CLOCK
Time base is set by dividing 4MHz crystal using CCP1and TMR1. LED module is 9mm 4 digits of 7 segment.
JQ6500 includes memory chip of 2/4 MB and used to store the sound tracks (no need for SD Card). Loading the tracks to the memory is done using an app on the JQ6500 , change the app (MusicDownload.exe file) Compatibility to Windows 7 to get it to work properly. Sound tracks in English can be downloaded from the top of this page, they can be changed to any
language, you can also record your own voice.
Volume is set by holding VOLUME pressed and then pressing MINUTES to reduce volume or pressing HOUR to increase volume. Pressing for 15 seconds changes volume from min to max.
More about JQ6500: https://community.element14.com , https://components101.com
 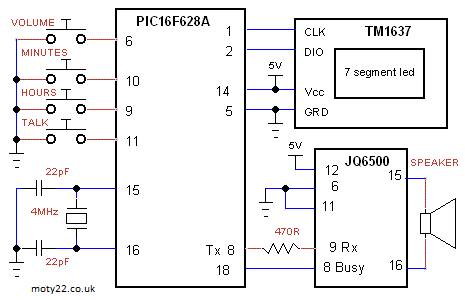 
PIC16F628A LED MODULE TM1637 TALKING CLOCK
Time base is set by dividing 4MHz crystal using CCP1and TMR1. LED module is 9mm 4 digits of 7 segment.
Pressing TALK requests relevant
tracks of hours and minutes to be played. Tracks can be changed to any
language, wav or mp3, you can also record your own voice.
The SD card in the player must be
formatted to FAT32. The player reads the tracks in the order they are
written (not by the names), as an example track 53msg.mp3 is read by the
dfplayer . Tracks files must be copied to the SD one
track at a time and in the order they are in the computer folder. No
other files or folders should be on the card. If you
wish to change any of the tracks you need to reformate the SD first and
then copy the new files.
Datasheet for the DFPlayer: http://www.picaxe.com/docs/spe033.pdf
  
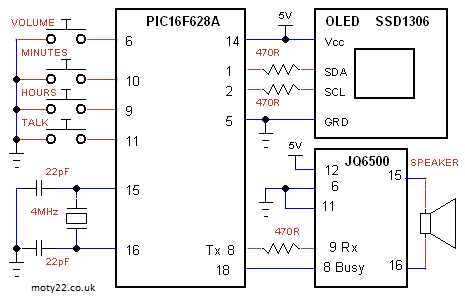
PIC16F628A OLED JQ6500 TALKING CLOCK
JQ6500 includes memory chip of 2/4 MB and used to store the sound tracks (no need for SD Card). Loading the tracks to the memory is done using an app on the JQ6500 , change the app (MusicDownload.exe file) Compatibility to Windows 7 to get it to work properly. Sound tracks in English can be downloaded from the top of this page, they can be changed to any
language, you can also record your own voice.
Volume is set by holding VOLUME pressed and then pressing MINUTES to reduce volume or pressing HOUR to increase volume. Pressing for 15 seconds changes volume from min to max.
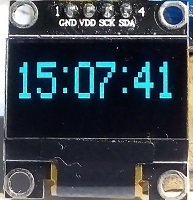
OLED: The pic drives the OLED using software I2C (bit banging). Time base is set by dividing 4MHz crystal using CCP1and TMR1. OLED module is 0.96", I2C, SSD1306 driver, 128x64. If using 0.91", 128x32 OLED 2 changes are needed in the code: change definition of yc to 0 and in void oled_init() change command(0x12) to command(0x22).
More about JQ6500: https://community.element14.com , https://components101.com
 PIC16F628A OLED TALKING CLOCK
OLED: The pic drives the OLED using software I2C (bit banging). Time base is set by dividing 4MHz crystal using CCP1and TMR1. OLED module is 0.96", I2C, SSD1306 driver, 128x64. If using 0.91", 128x32 OLED 2 changes are needed in the code: change definition of yc to 0 and in void oled_init() change command(0x12) to command(0x22).
Pressing TALK requests relevant
tracks of hours and minutes to be played. Tracks can be changed to any
language, wav or mp3, you can also record your own voice.
The SD card in the player must be
formatted to FAT32. The player reads the tracks in the order they are
written (not by the names), as an example track 53msg.mp3 is read by the
dfplayer . Tracks files must be copied to the SD one
track at a time and in the order they are in the computer folder. No
other files or folders should be on the card. If you
wish to change any of the tracks you need to reformate the SD first and
then copy the new files.
Datasheet for the DFPlayer: http://www.picaxe.com/docs/spe033.pdf
  
 PIC LCD DFPlayer TALKING CLOCK
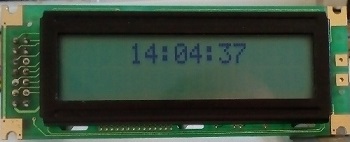
The pic drives the LCD to display hours
and minutes. Time base is set by dividing the crystal oscillator. Using PIC16F876A/628A.
Pressing TALK requests relevant
tracks of hours and minutes to be played. Tracks can be changed to any
language, wav or mp3, you can also record your own voice.
The SD card in the player must be
formatted to FAT32. The player reads the tracks in the order they are
written (not by the names). Track files must be copied to the SD one
track at a time and in the order they are in the computer folder. No
other files or folders should be on the card. If you
wish to change any of the tracks you need to reformate the SD first and
then copy the new files.
Datasheet for the DFPlayer:
http://www.picaxe.com/docs/spe033.pdf
The LCD module is HD44780
compatible, most modules on sale are. It can be 1 or 2 lines.
After programming the PIC16F876A connect pin 1 (reset) to 5V.
Circuit Description
See also Technical Tips
DFPlayer mini module is sold as MP3 player for Arduino. https://www.ebay.co.uk
1K /470R resistor is to reduce the 5V output of the PIC to 3.3V input of the
DFPlayer.
Volume can be controlled by pushbuttons connected to pins
9, 11 of the DFPlayer, see the datasheet.
Connecting 10-100 ohm resistor in series to the speaker reduces the volume and the
current from the 5V supply.
LCD display is 1 or 2 lines 16 characters module.
Pic16f876a link
between pins 11 and 12 connects output of CCP2 to the input of TIMER1.
ANDROID TALKING CLOCK
The clock uses Text To Speech built in Android device, for reading the
time. It reads time hourly at the background. The app is made in B4A
(basic for Android).
Included code for the app, if you wish to change it download free IDE from:
https://www.b4x.com/
To install the app on Android device place the APK file in the device,
when you open the file it ask if you want it installed.
Leave the
clock running in your office so at least once every hour you get to hear
something that makes sense.
|
![]()
moty22.co.uk 2008-2025